Get started
Looking for v2 of OmiLAXR? Click here.
Here, educators, students, and developers can find technical guides, best practices, case studies, and examples. Whether you're new to XR or an experienced developer, you'll find useful information to help you integrate XR into learning.
We hope you find our resources helpful. Thank you for exploring XR in education with us.
Table of Contents
- 0. Prepare your XR project
- 1. Prepare Unity package scope (recommended)
- 2. Prepare xAPI Registry
- 3. Install xAPI4Unity package
- 4. Install OmiLAXR Framework
- 5. Install adapter packages for best compatibility
- 6. Setup OmiLAXR Framework
- 7. How to build xAPI statements
- 8. Tracking systems and controllers
- 9. How to validate tracked data
- 10. How to write own adapter
- 11. How to write registers
Step 0: Prepare your XR project
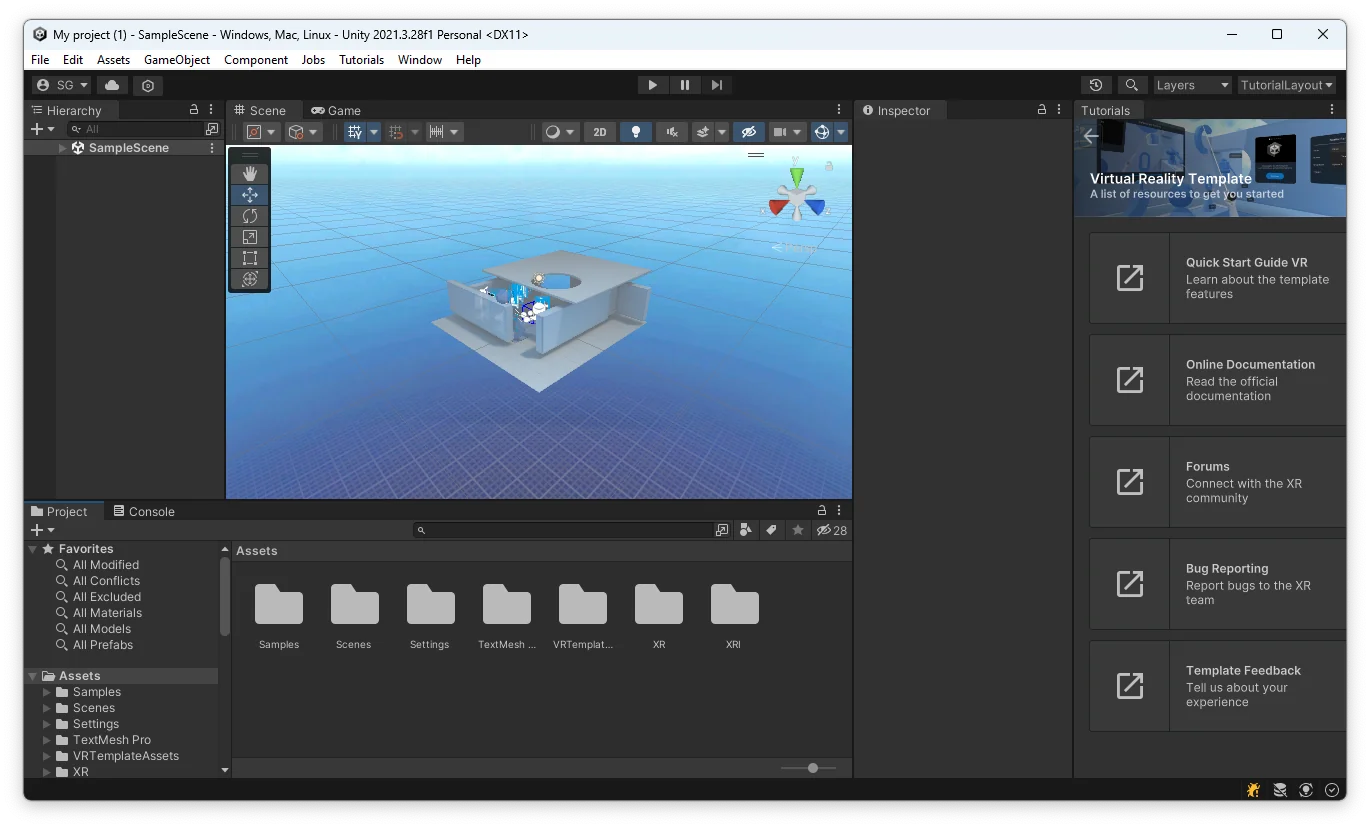
Make sure you have an XR project. Currently we are compatible with SteamVR and UnityXR projects. Further XR frameworks are coming soon. If you are interested to make it your own compatible than contact us on Discord.
Step 1: Prepare Unity package scope (recommended)
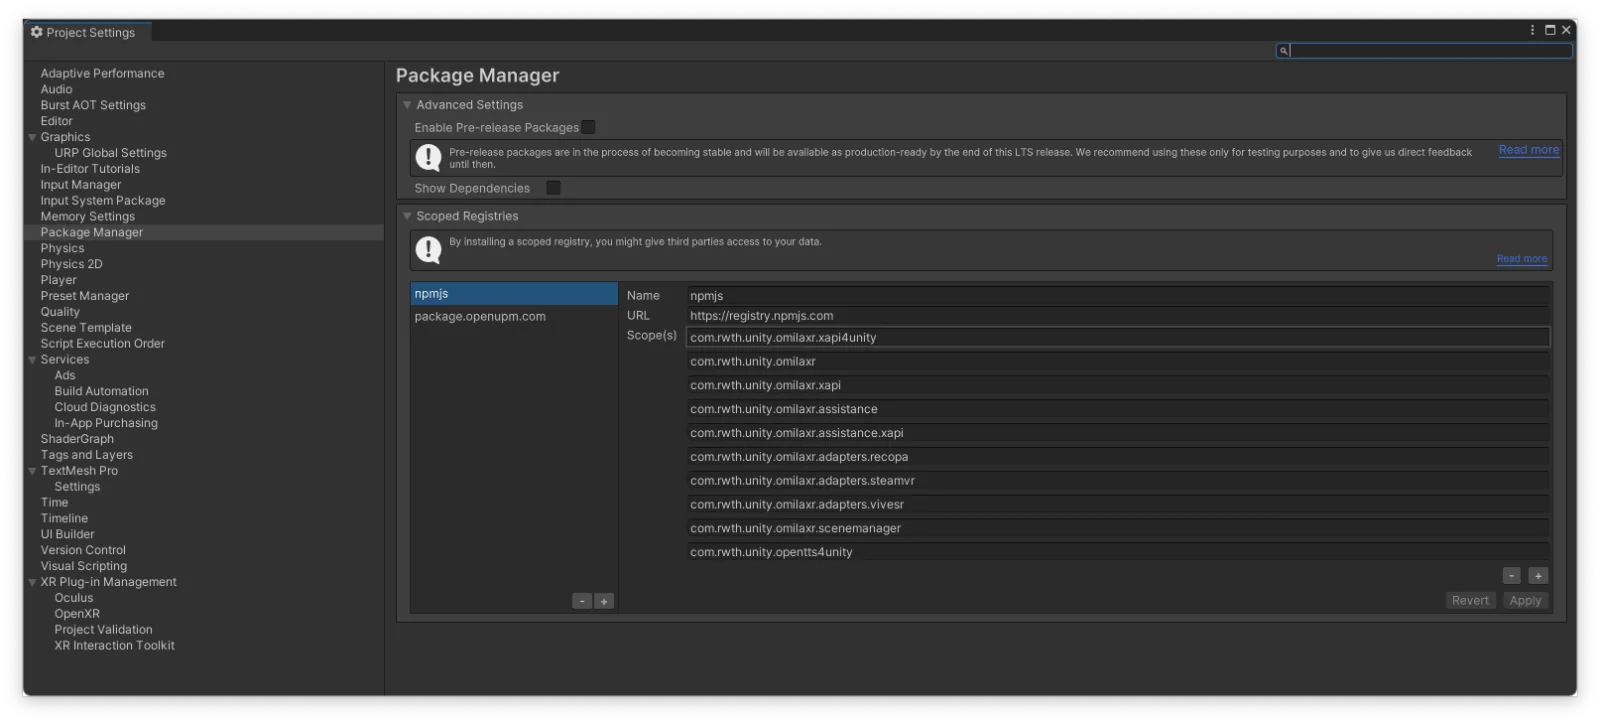
Unity packages are only looking for packages hosted by Unity. To enable third-party packages (like OmiLAXR) you need to add the registers to your project. This can do this either by Unity editor or by directly edit your manifest.json file of the project.
We recommended to just add all scopes of OmiLAXR by using manifest.json
Open for this the file <project_root>/Packages/manifest.json any code editor and look for scopedRegistries entry. If there is no entry, than just put next to dependencies following code.
After saving the file, you should open Unity editor and check under Edit > Project Settings... if the scopes are applied (see Fig. 2).
{
  "dependencies": {
    "...": "..."
  },
  "scopedRegistries": [
    {
      "name": "npmjs",
      "url": "https://registry.npmjs.com",
      "scopes": [
        "com.rwth.unity.omilaxr.xapi4unity",
        "com.rwth.unity.omilaxr",
        "com.rwth.unity.omilaxr.xapi",
        "com.rwth.unity.omilaxr.assistance",
        "com.rwth.unity.omilaxr.assistance.xapi",
        "com.rwth.unity.omilaxr.adapters.recopa",
        "com.rwth.unity.omilaxr.adapters.steamvr",
        "com.rwth.unity.omilaxr.adapters.unityxr",
        "com.rwth.unity.omilaxr.adapters.vivesr",
        "com.rwth.unity.omilaxr.scenemanager",
        "com.rwth.unity.opentts4unity"
      ]
    },
    {
      "name": "package.openupm.com",
      "url": "https://package.openupm.com",
      "scopes": [
        "com.itisnajim.socketiounity"
      ]
    }
  ]
}
Step 2: Prepare xAPI Registry
For data tracking we are using the xAPI data format. To get an idea of the eXperience API please read the official documentation (https://xapi.com/statements-101/).
For standardization purpose we established an own xAPI registry specialized for different research domains. One domain is virtualReality (extendedReality is in progress). We maintain our registry on in our GitLab repository https://gitlab.com/learntech-rwth/xapi. For a more user friendly maintenance we created an user interface https://omilaxr-ecosystem.github.io/xapi/
OmiLAXR is using this registry for tracking interactions of the XR scenarios. This is why you will need a local copy of the xAPI repository. You have following options to get it:
- (a) Download zip and unpack inside your Unity project and maintain it in your XR project.
- (b) Request a branch in our official repository and clone it as submodule into your Unity project.
- (c) Fork our repository and clone the fork as submodule into your Unity project.
- (d) Include Unity package of xAPI registry (currently not available)
As we invite you to contribute to new vocabulary we strongly recommend option (c).
After you have prepared the repository you shall have a xapi folder in your project. We strongly recommend to place it into Assets folder.
Step 3: Install xAPI4Unity package
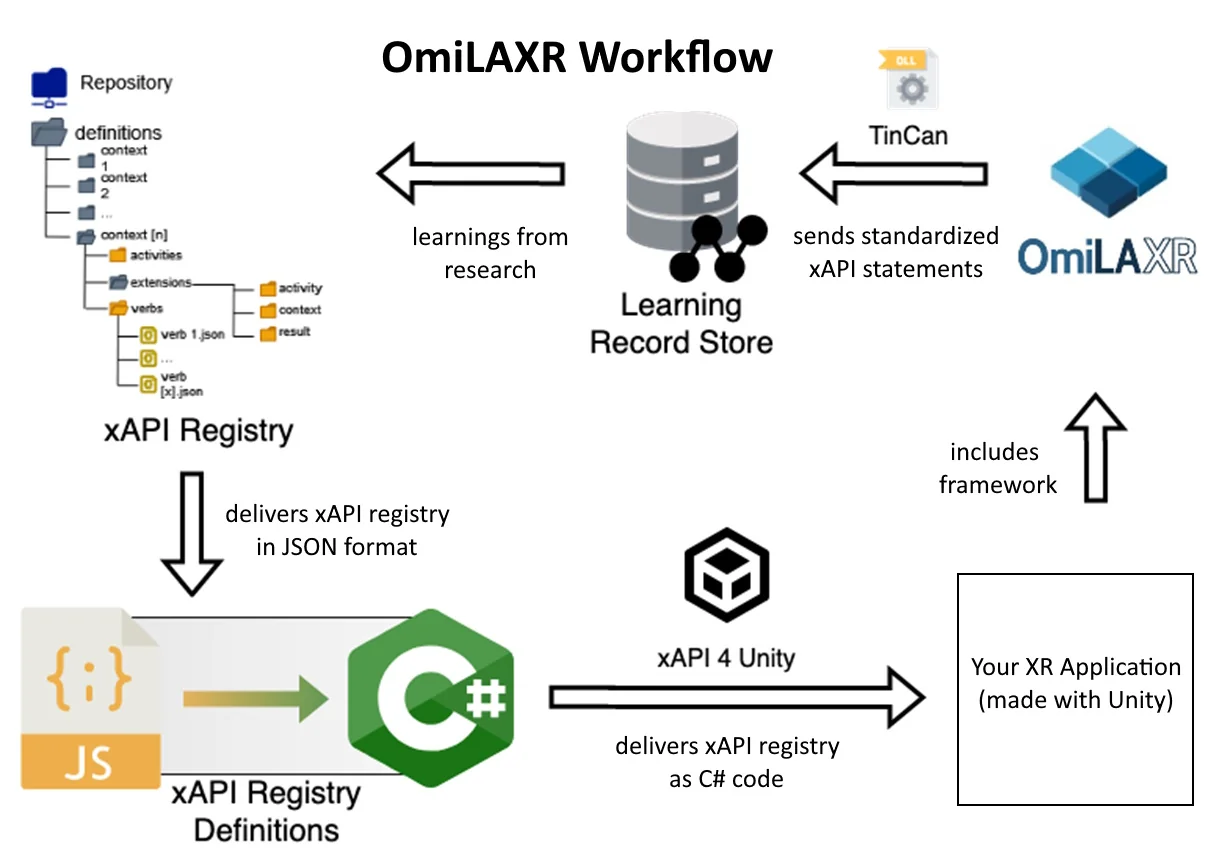
For working more easy, consistent and IDE-supported, we created a tool which transforms the xAPI registry into C# code you can use. In this step you will import this tool. In Fig. 6 you can get an overview of our idea.
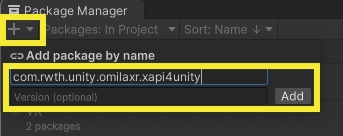
In Unity menu navigate to Window > Package Manager, then on + in the top left corner. Type now com.rwth.unity.omilaxr.xapi4unity into the "name" field (see Fig. 3). More details about this package you can read in https://gitlab.com/learntech-rwth/omilaxr-ecosystem/xapi-4-unity.
Alternatively you can go to "My registries" and just select the available package in the list (see Fig. 4).
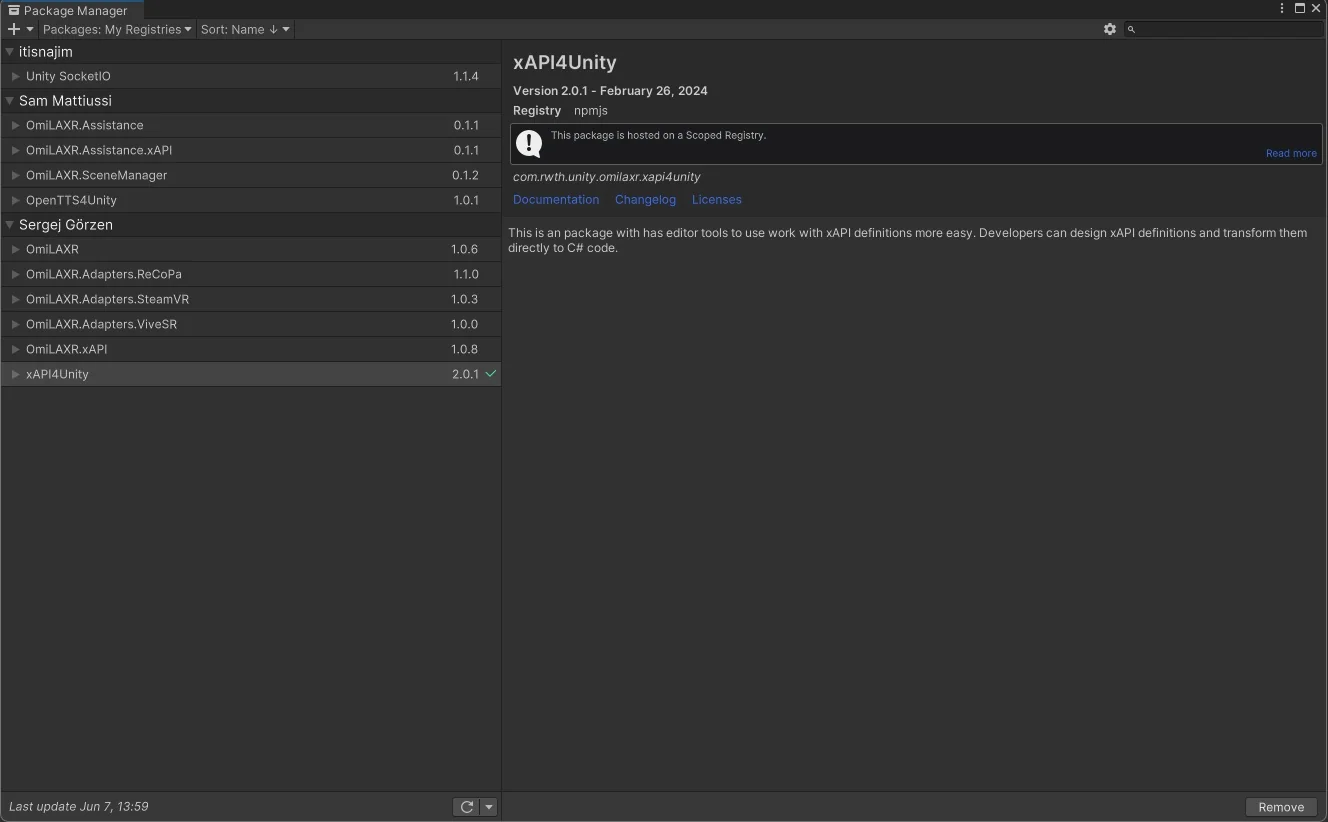
xAPI4Unity Window
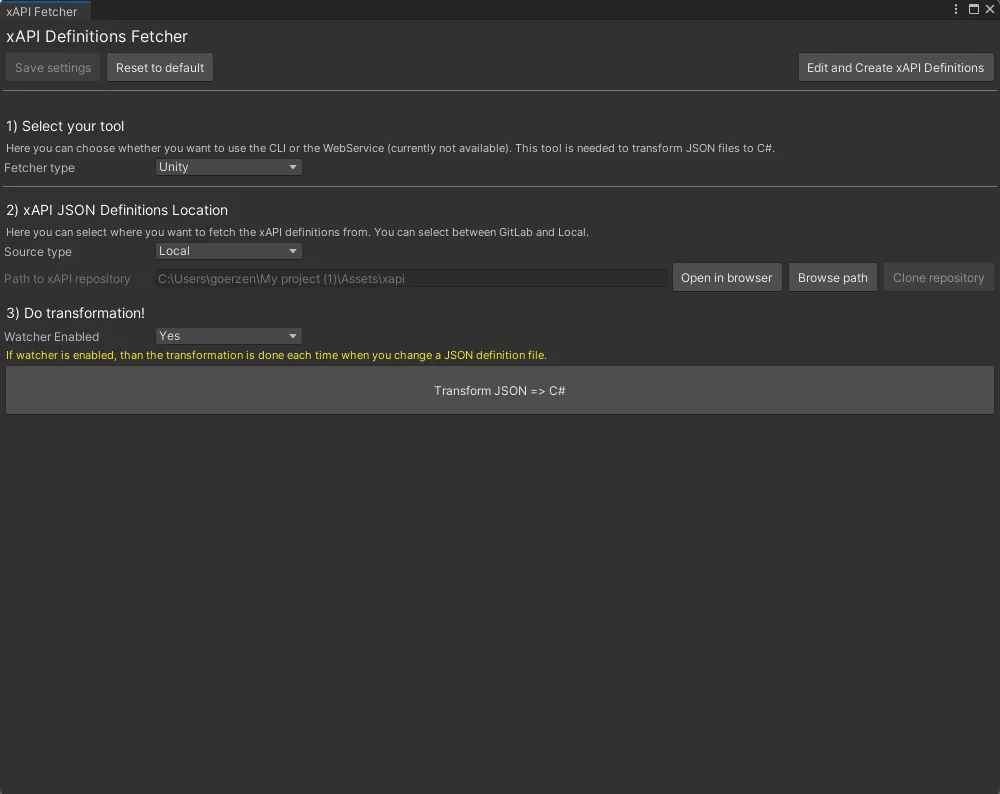
Now, xAPI4Unity is installed and can be used in your Unity project. If you already have the folder Assets/xapi then you can use it directly. But we recommend to check whether everything is configured correctly. For doing this, go to OmiLAXR > xAPI > Open Fetcher Window. Now, you have to check if every path is correct. The recommended settings are defined by default. If you haven't cloned a xAPI repository folder, yet you can do it by clicking the "Clone repository" button. Make sure you have no error messages and your window looks similar to Fig. 5. To (re-)transform the JSON files to C# you have to click the button "Transform JSON =< C#". After transformation you shall have the folder Assets/xAPI.Registry containing all C# files.
Step 4: Install OmiLAXR Framework
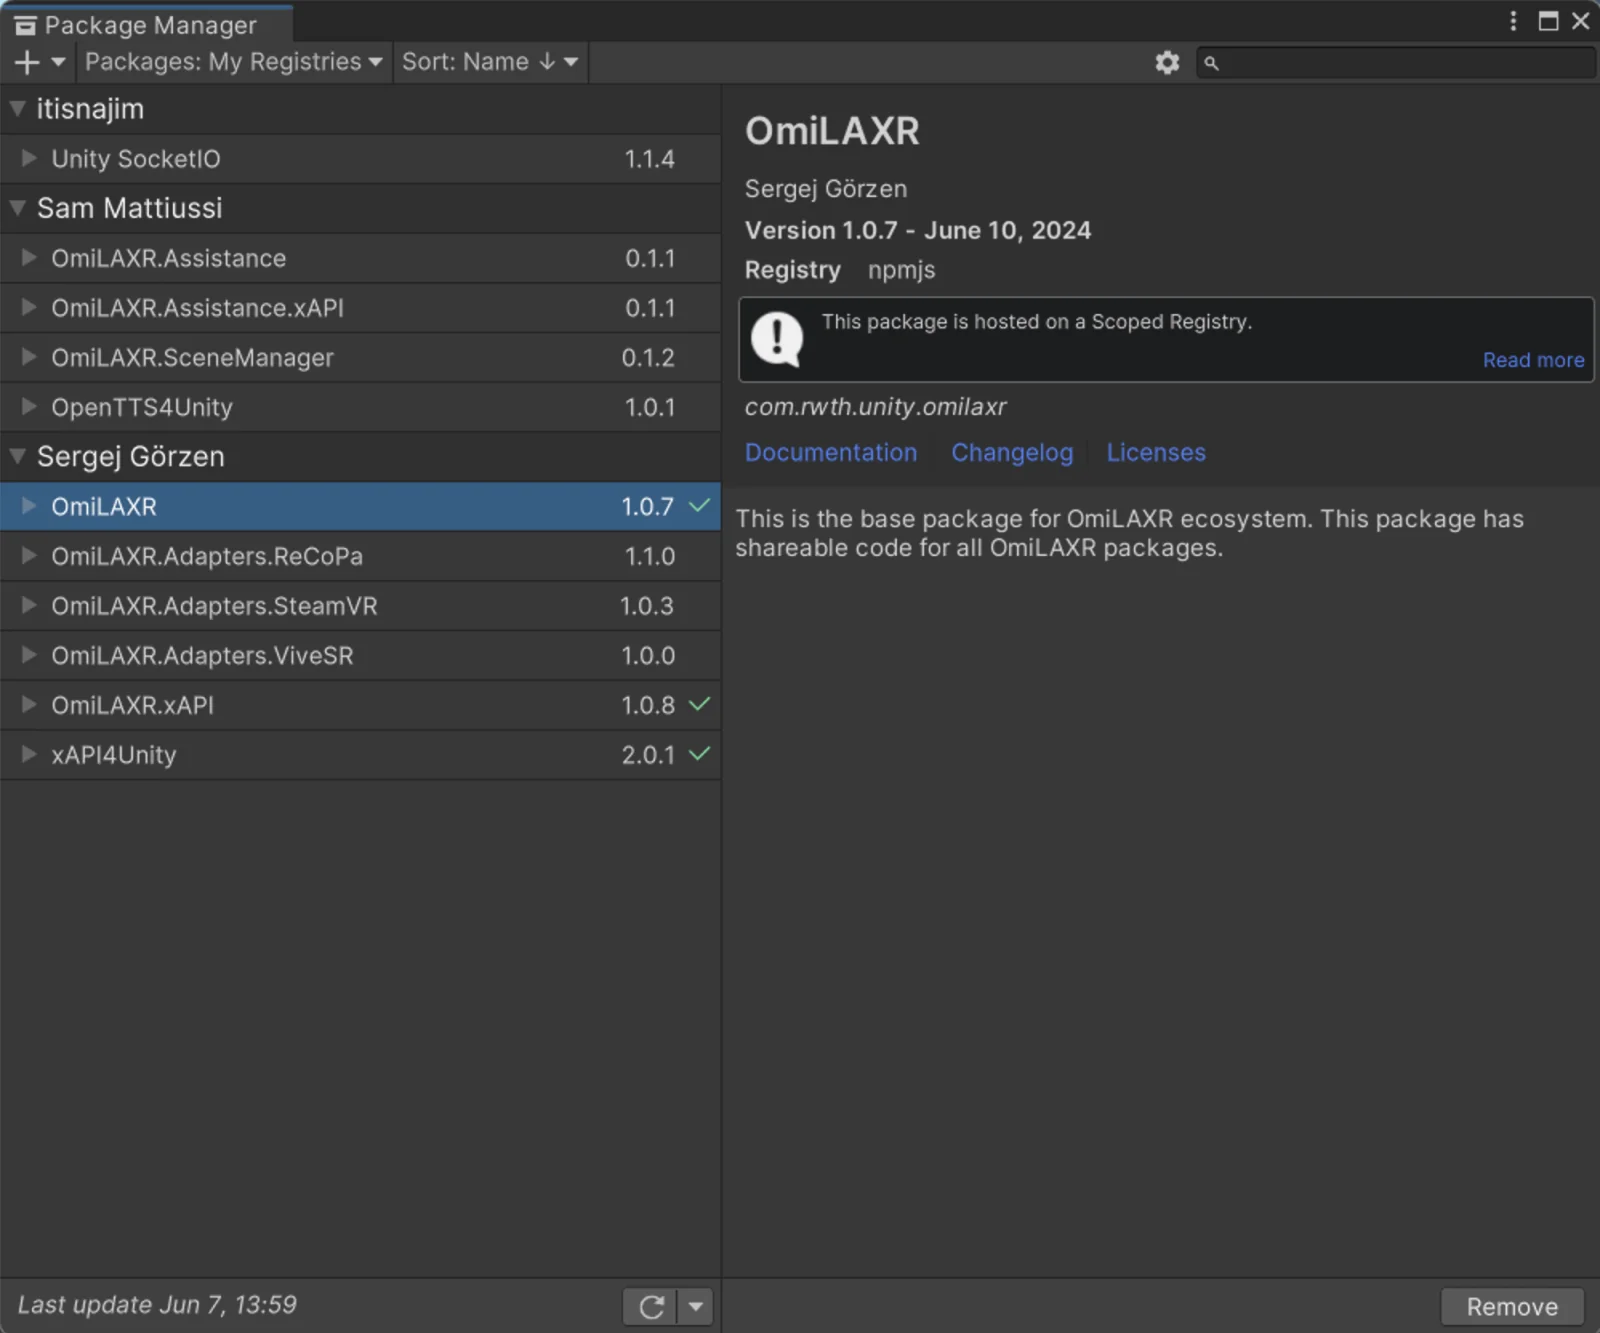
Open Window > Package Manager and install the packages com.rwth.unity.omilaxr and com.rwth.unity.omilaxr.xapi version 1.0.7(see Fig. 9). You can do this by using the namespaces (recommended) or their git urls.
TinCan Library
To use OmiLAXR.xAPI you need the TinCan.NET library:
- (1) Download the DLL file from https://github.com/SGoerzen/TinCanUnity/releases/download/1.3.0.2/TinCan.dll.
- (2) Create the folder Assets/Plugins.
- (3) Place TinCan.dll in Assets/Plugins.
- (4) Open Unity to let it reload.
Include OmiLAXR to your project
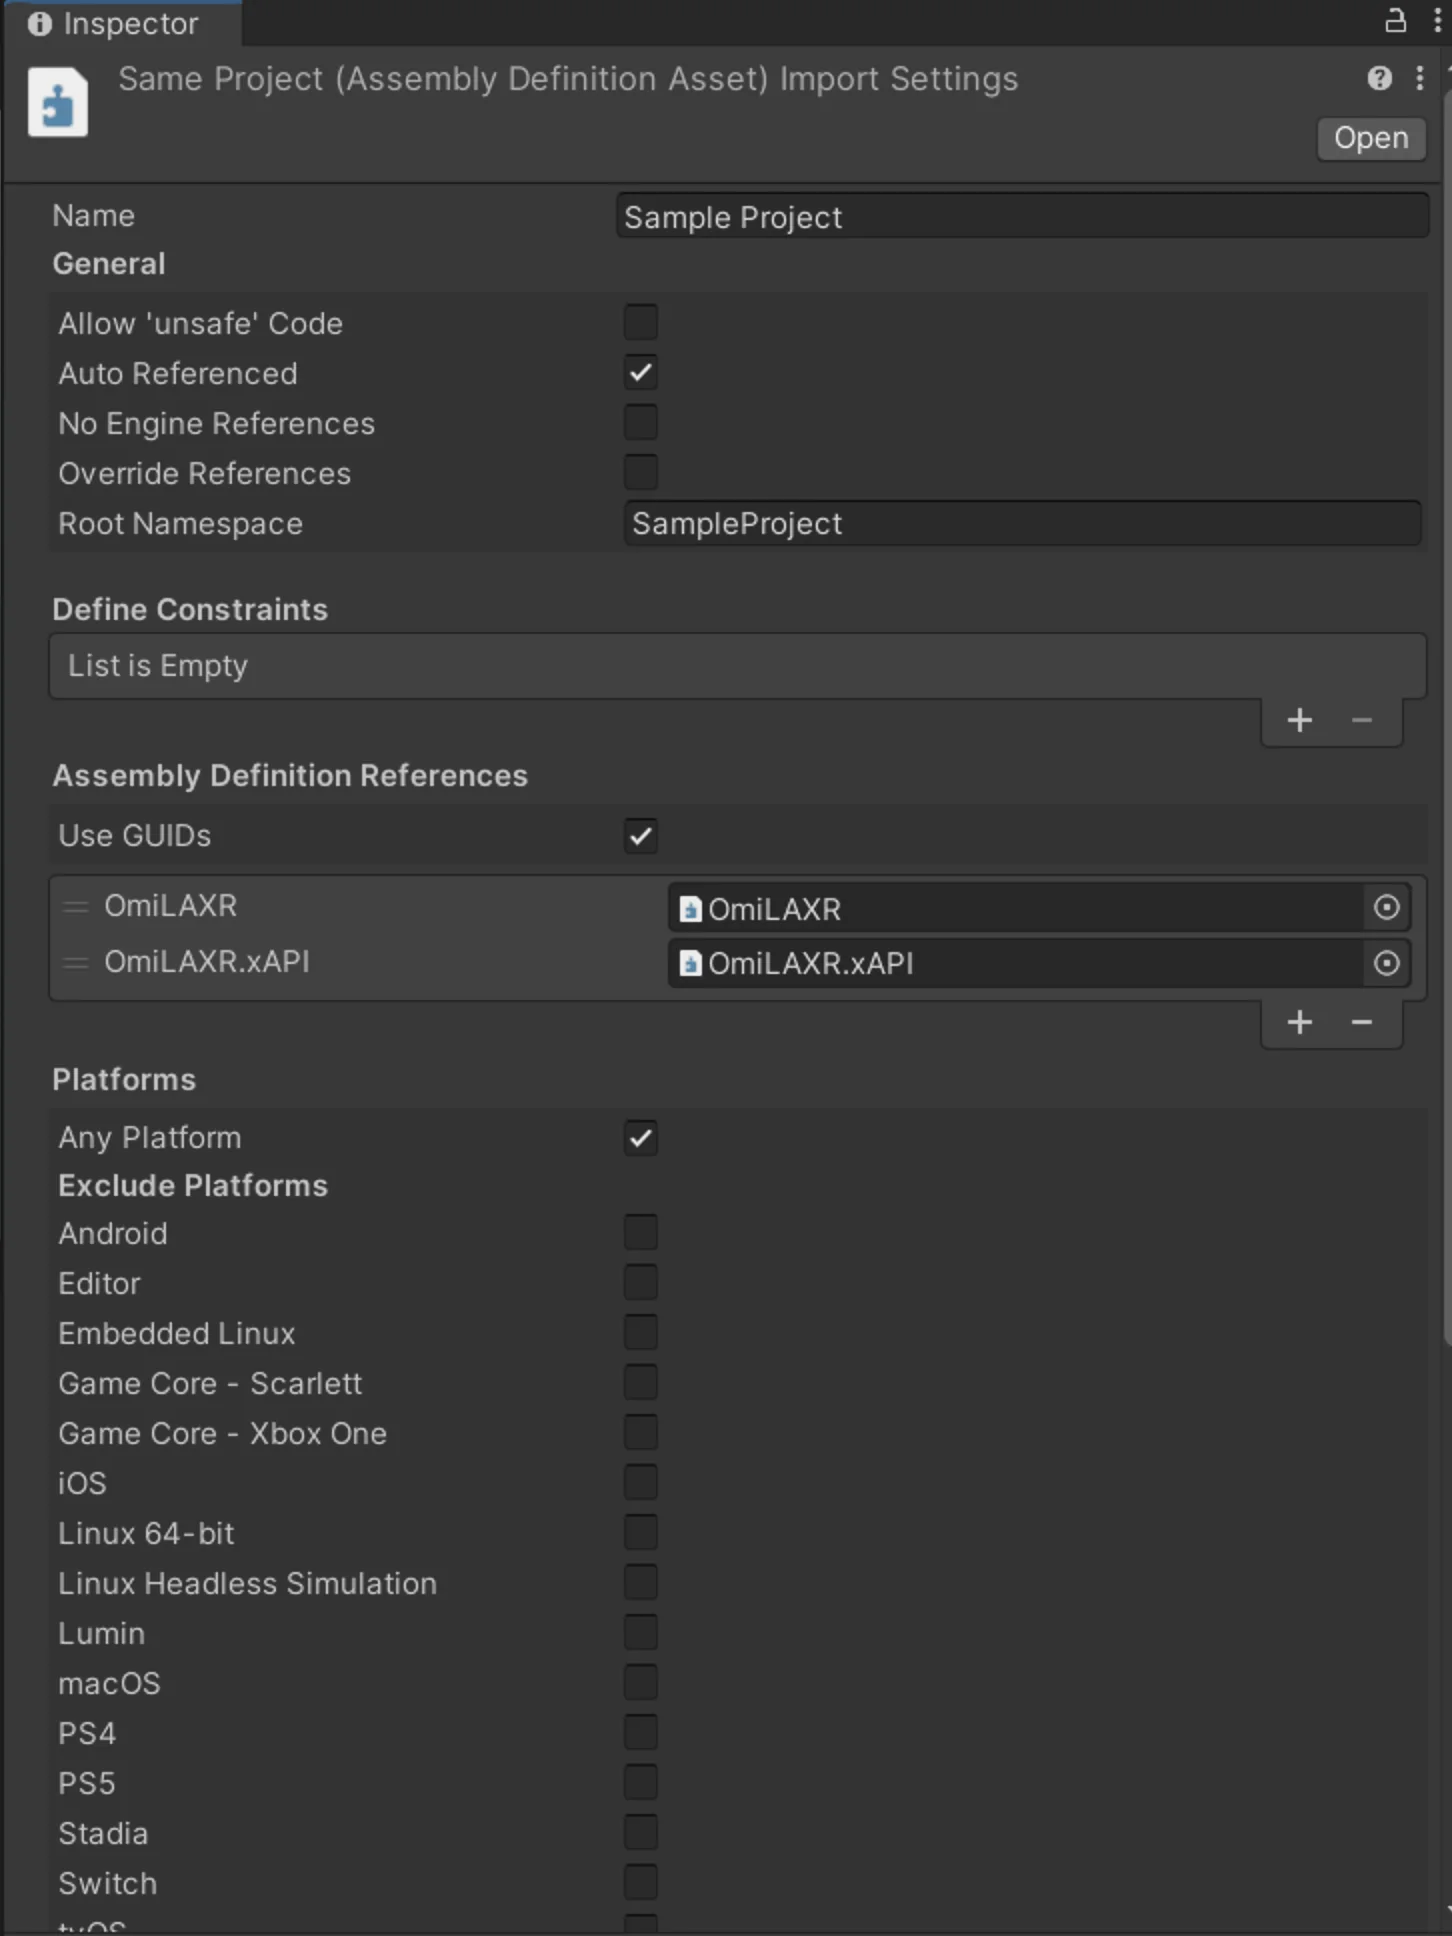
We your project is not using any asmdef-file it should work without including OmiLAXR asmdef file. But we recommend to use a asmdef file in your project. To do this create with right click in assets window a new one Assembly Definition in root of your Unity scripts. After that you have to include OmiLAXR to your project. To achieve this follow these steps:
- (1) Select your asmdef file.
- (2) Add a new entry in Assembly Definition References inInspector window (see Fig. 10).
- (3) Select OmiLAXR by double click.
- (4) Repeat the same for OmiLAXR.xAPI.
- (5) Scroll down in Inspector window and click on "Apply".
Now, you have successfully installed the base packages for OmiLAXR.
Step 5: Install adapter packages for best compatibility
Supporting all XR frameworks is not trivial. They differ (for example) in interaction and teleport behavior or player game object hierarchies. This is why OmiLAXR is working with interfaces to achieve a generic tracking behavior (see IPlayer). In center of our tracking system we have a Learner who is inside a Learning Environment. This way it is possible to track player position on different XR frameworks. So we recommend to always target Learner (see here) by code, whenever you want to target the player.
var learner = Learner.Instance;
if (learner.IsXR)
{
	// do XR only stuff
}
var position = learner.Player.WorldPosition;
var camera = learner.Player.GetCamera();
...
Another advantage is that not every project needs all features. To cover these use cases we developed so called "Adapters". A adapter may define how a Playerlooks like on a specific framework or application. We developed already adapters for UnityXR com.rwth.unity.omilaxr.adapters.unityxrand SteamVR com.rwth.unity.omilaxr.adapters.steamvr. MRTK is in development (see https://gitlab.com/learntech-rwth/omilaxr-ecosystem/adapters/omilaxr.adapters.mrtk). If we dont have an adapter you need, you can easily write your own (see Step 10).
Further, we have adapters for external tools like the Researcher Companion Panel. This can configure tracking setups by a desktop UI (useful for studies). With this adapter OmiLAXR is able to communicate with ReCoPa (see https://gitlab.com/learntech-rwth/omilaxr-ecosystem/adapters/omilaxr.adapters.recopa.
Step 6: Setup OmiLAXR Framework
First of all ensure, you have installed all needed adapters for your project (depending on your needs).
To enable the tracking systems you need to add following prefabs. To make it easier you can click the right mouse button inside of Hierarchy window in Unity and open the menu itemOmiLAXR (see Fig. 11).
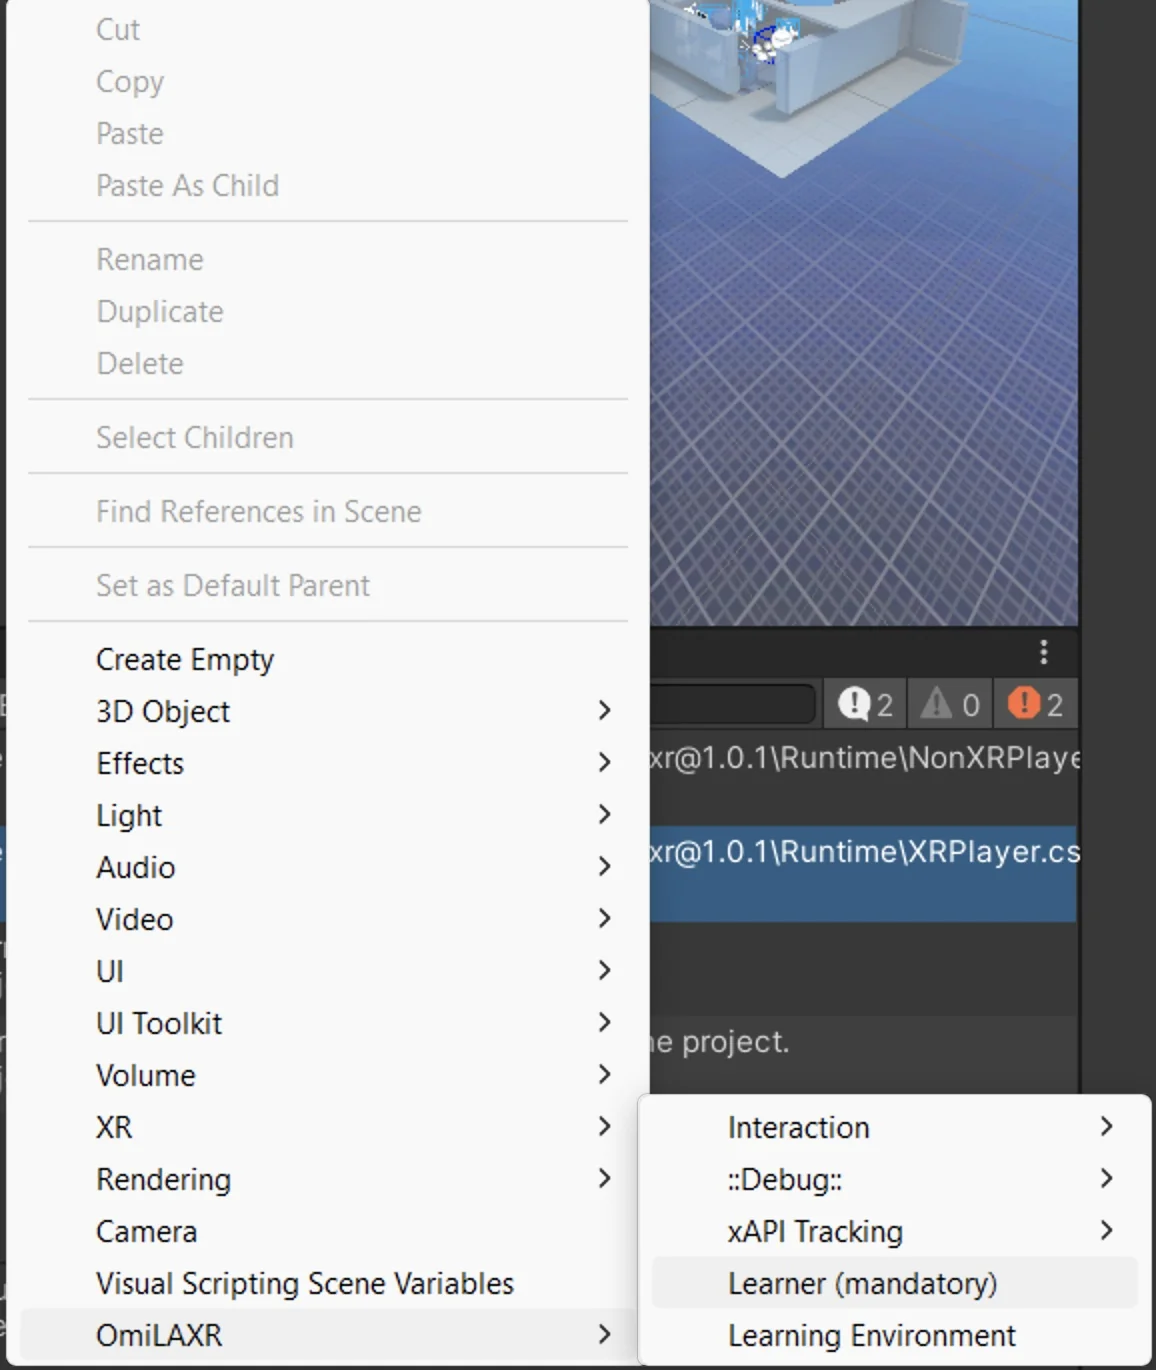
Please add following prefabs by using the menu. We recommend to add all tracking systems and remove those you dont need:
- (1) Hierarchy > OmiLAXR > Learner (mandatory)
- (2) Hierarchy > OmiLAXR > Learning Environment
- (3) Hierarchy > OmiLAXR > xAPI Tracking > Main Tracking System Pack
- (4) Hierarchy > OmiLAXR > Adapters > SteamVR/UnityXR/...
Setup Learning Record Store (LRS)
To setup tracking config you need client key and secretof your LRS. You can place them in four different ways:
- (1) By code:
var lrs = LrsController.Instance; lrs.clientKey = "xxxxxxxxxxxx"; lrs.clientSecret = "yyyyyyyyyyyyy"; MainTrackingSystem.Instance.autoStartTracking = true; - (2) By using ReCoPa (todo screenshot)
- (3) By using Unity component
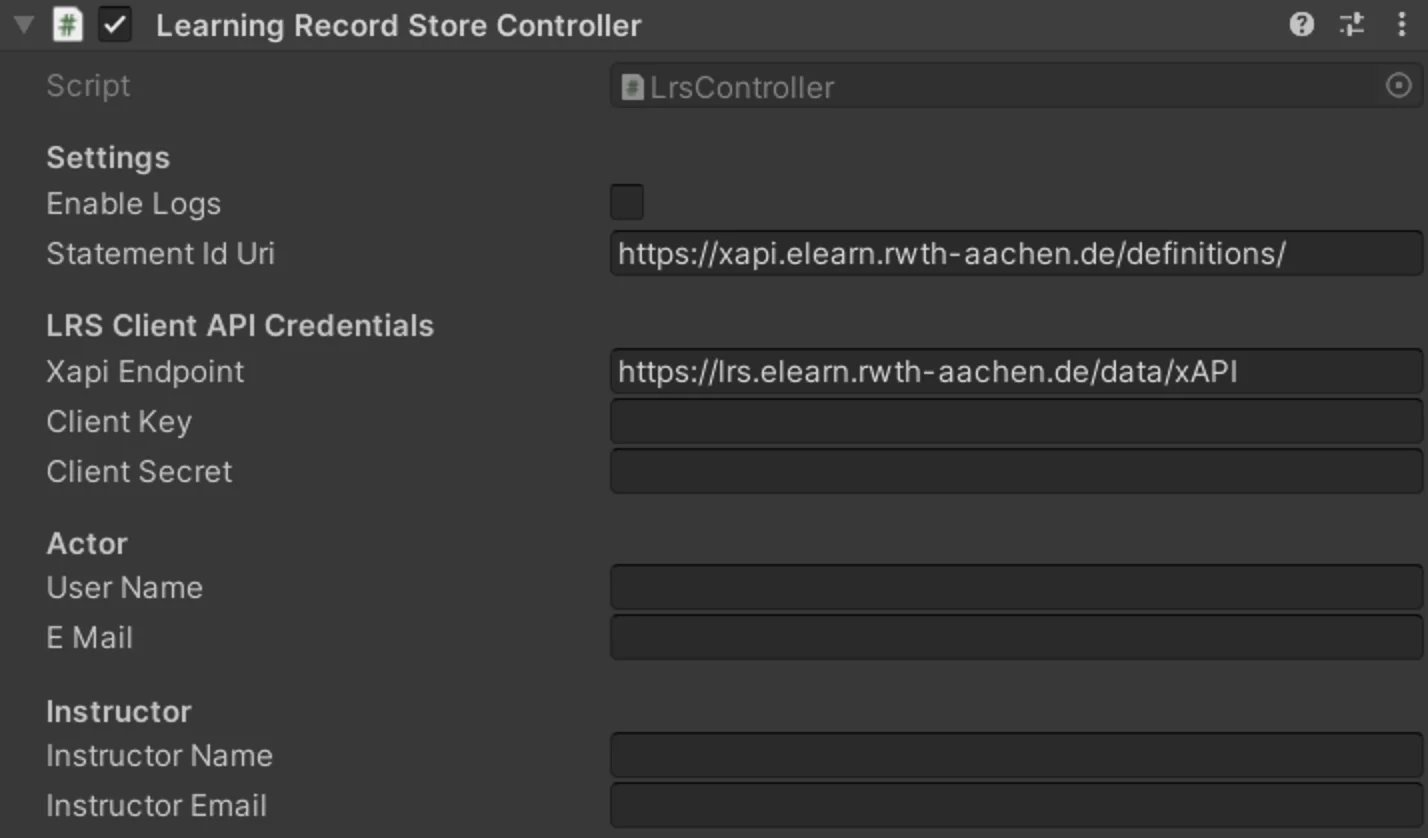
Fig. 12: LRS Component
The credentials you can get from your Learning Record Store. In Learning Locker you can find them inSettings > Clients. In our experience it may help to use a local LRS for development (for example https://github.com/yetanalytics/lrsql).
Start and stop tracking
You can start or stop tracking by code or by using ReCoPa. To doing it by code you can do it by following code.
// Can be also enabled in Unity inspector
MainTrackingSystem.Instance.autoStartTracking = true;
// Start/Stop Tracking
MainTrackingSystem.Instance.StartTracking();
MainTrackingSystem.Instance.StopTracking();
Trackables and Gazables
To make game objects trackable you have to assign them the Trackable component. This can be also done by using right click and Hierarchy > OmiLAXR > xAPI Tracking > Make GameObject trackable. The same can be done for Gazeable (for eye tracking).
This makes sense because not every game object need to be tracked (e.g. ground or sub game objects of a complex one). In complex game objects it is important to assign the Trackable component to the part which has a collider. A custom trackable name can help for identification.
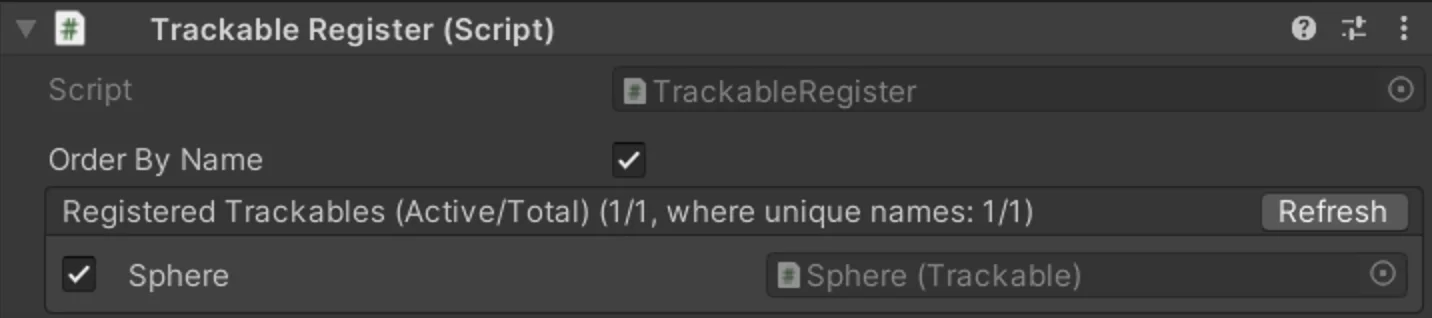
All trackables are collected inside of the Trackable Register. This component helps to keep the overview (see Fig. 8). In this example, we have added the Trackable component to the game object "Sphere". If you click on the entry you will be navigated directly to the game object.
Step 7: How to build xAPI statements
From now on, if you edit JSON files inside your IDE (and safe the changes), the transformation happens in background automatically. In Fig. 7 you can see how we build a statement. For this you need to use the static classxAPI_Definitions. The SendStatement(...)method is either usable inside of tracking systems and controllers (see Step 8), but also from everywhere by using LRS.Instance.SendStatement(...) (see https://docs.omilaxr.dev/scripts/OmiLAXR.xAPI.LRS.html).
Step 8: Tracking systems and controllers
The main tracking system contains sub tracking systems. A tracking system can be imagined as a group of tracking behaviours. For example: "Interaction Tracking System" manages "Mouse", "Keyboard", "Laser Pointer" or "Interactions" tracking controllers. Each tracking controller handles on its on how to track data. If you tracking behavior is less complex, it may be enough to just write a tracking system instead of multiple controllers.
Create own tracking system
To create an own tracking system, you have to create a new Unity script. Now, it is enough to extend from base class TrackingSystemBase and to attach to a game object in your Unity scene. The script will be registered to the MainTrackingSystem automatically. For demonstration, lets look into InteractionTrackingSystem. Inside the StartTracking(...)method you can handle what tracking controllers are handled by this system. Alternatively, you can track data directly from this class.
public class InteractionTrackingSystem : TrackingSystemBase
{
    private static InteractionTrackingSystem _instance;
    /// <summary>
    /// Singleton instance of the InteractionTrackingSystem. Only one can exist at a time.
    /// </summary>
    public static InteractionTrackingSystem Instance => _instance ??= FindObjectOfType<InteractionTrackingSystem>();

    public override MonoBehaviour GetInstance() => Instance;
    public override void StartTracking(MainTrackingSystem mainTrackingSystem, TrackingContext ctx)
    {
       AddTrackingController<UiInteractionController>();
       AddTrackingController<InteractionController>();

       if (Learner.Instance.IsVR)
       {
           AddTrackingController<ActionController>();
           AddTrackingController<LaserPointerController>();
        }
        else
        {
           AddTrackingController<MouseInteractionController>();
           AddTrackingController<KeyboardController>();
        }

        foreach (var tc in TrackingControllers)
        {
           tc.StartTracking(mainTrackingSystem, this, ctx);
           mainTrackingSystem.AddConsiderProvider(tc);
         }
        }

    public override TrackingMeta GetMeta(string metaContext) => TrackingMeta.Empty;
}
Create own tracking controllers
One way to track data is to use the "Consider" mechanism. A more intuitive option is currently in work, but the idea behind is following: a tracking controller is checking all trackable game objects and start tracking mechanism for it. For example you can look at MouseInteractionController. Alternatively, you can override StartTracking(...) and StopTracking(...)or trigger statements manually by using LRS.Instance.SendStatement(...) (like in Step 7).
public class MouseInteractionController : TrackingControllerBase {
...
    public override void Consider(GameObject go)
    {
        if (!_isTracking)
           return;
        // Skip not pointable, interactable or trackable objects
        var trackable = go.GetComponent<Trackable>();
        if (trackable == null || !trackable.Has(Gestures.Interacting, Gestures.Pointing))
            return;
        ...
        // Add interaction events to pointable
        if (trackable.Has(Gestures.Pointing))
        {
            mouseEvents.onMouseEnter.AddListener(OnEnter);
            mouseEvents.onMouseLeave.AddListener(OnLeave);
        }
        if (trackable.Has(Gestures.Interacting))
        {
            mouseEvents.onMouseClick.AddListener(OnClick);
            mouseEvents.onMouseDown.AddListener(OnDown);
            mouseEvents.onMouseUp.AddListener(OnUp);
        }
    }
...
}