OmiLAXR Pipeline
Looking for the setup guide? Click here.
The OmiLAXR Pipeline enables you to create modular tracking mechanisms structured as a pipeline.
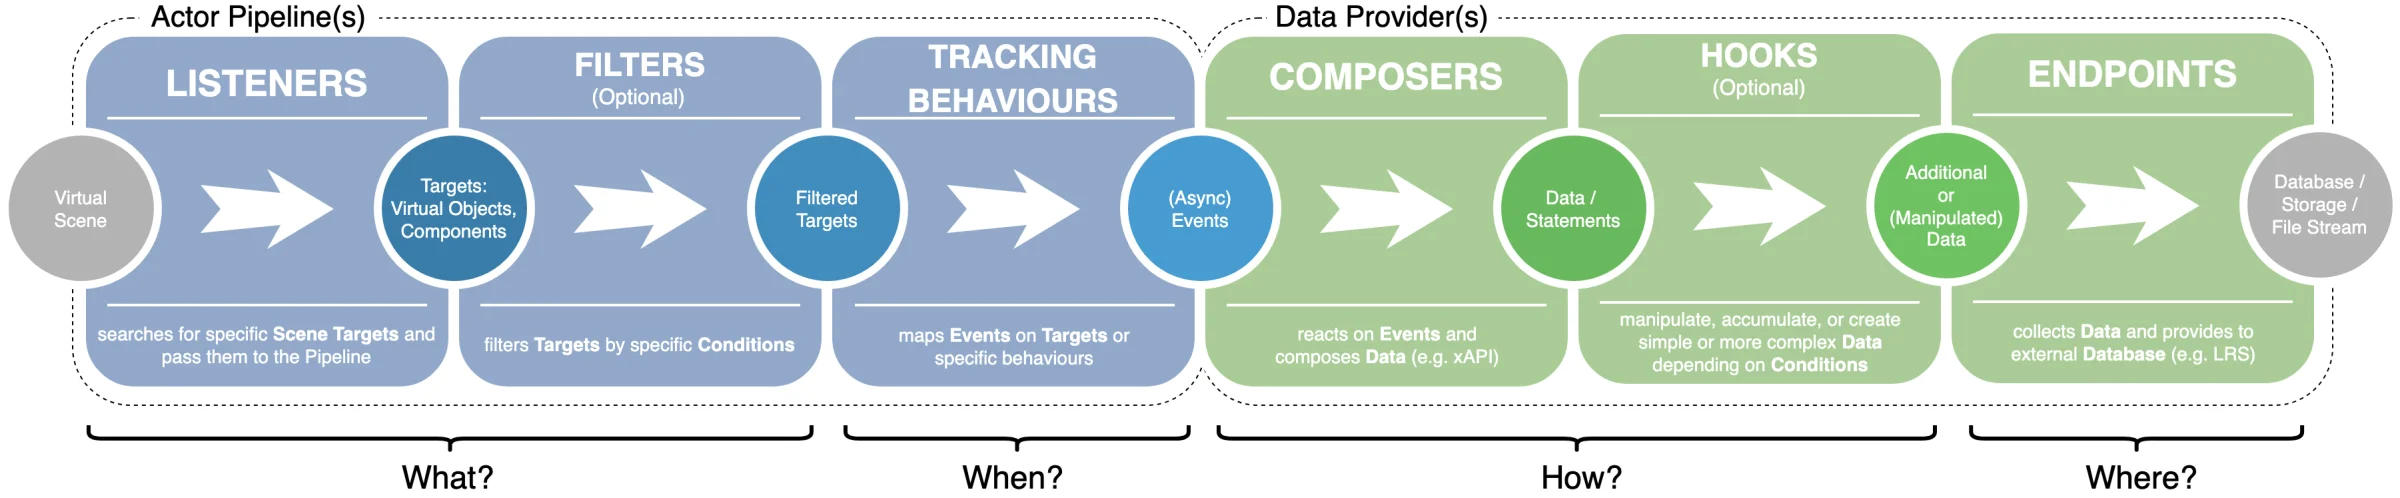
The pipeline is guided by four key questions:
- What targets should be tracked? (Listeners and Filters)
- When should tracking be triggered? (Tracking Behaviours)
- How should data be encoded? (Composers and Hooks)
- Where should the data be stored? (Endpoints)
Below, you’ll find detailed information about the pipeline components. Each code segment uses attributes that help structure and document it — we recommend using them.
- [AddComponentMenu("Path / In / Inspector")]: Organizes components in the Unity Inspector according to a specified path.
- [Description("Description of a component.")]: Adds a textual description to the component in the Unity Inspector.
- [ReadOnly]: Makes a field read-only in the Unity Inspector.
- [Gesture("Name of Gesture")] and [Action("Name of Gesture")]: Metadata used by other modules (e.g., OmiLAXR.ReCoPa (WIP)) to enable or disable events.
Table of Contents
- 0. Actor Pipelines and Data Providers
- 1. Listener
- 2. Filters
- 3. Tracking Behaviours
- 4. Composers
- 5. Hooks
- 6. Endpoints
Step 0: Actor Pipelines and Data Providers

The overall process involves multiple actor pipelines that communicate with available data providers via asynchronous events. A virtual scene is asynchronously transferred to a database.
Both categories interact through asynchronous events, allowing the use of multiple pipelines and, if necessary, multiple data providers.
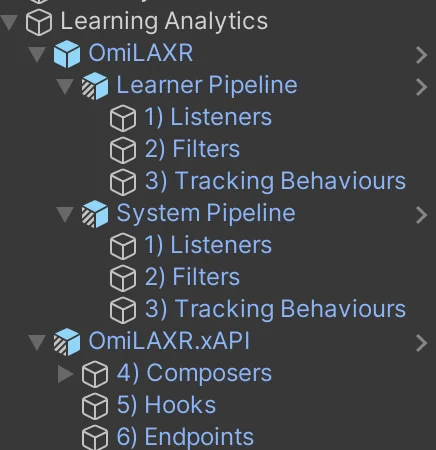
The key idea is to maintain separate pipelines for different actors. By default, OmiLAXR provides a Learner Pipeline and a System Pipeline. The Learner Pipeline processes actions and objects related specifically to learner interactions (e.g., teleport events), while the System Pipeline handles system-related interactions (e.g., game start). This separation makes it possible to extend existing pipelines with new components or to build entirely new pipelines depending on the use case.
 OmiLAXR
The "Data Provider" stage operates independently of any specific data standard. In our examples, we use xAPI. To send data to the learning record store, the OmiLAXR.xAPI module provides a set of Data Provider components for working with xAPI. Therefore, in the following instructions, we will also be working with xAPI.
 OmiLAXR.xAPI
The components are strictly organized in the game object hierarchy. OmiLAXR provides the core system and ready-to-use components for the blue part of the pipeline, while OmiLAXR.xAPI provides ready-to-use components for the green part. Both also include prefabs with predefined component sets (see Fig. 2).
As an example, in Fig. 3 you can see the Learner Pipeline. The actor is defined by a custom component, and you can see a Learner Pipeline component attached.
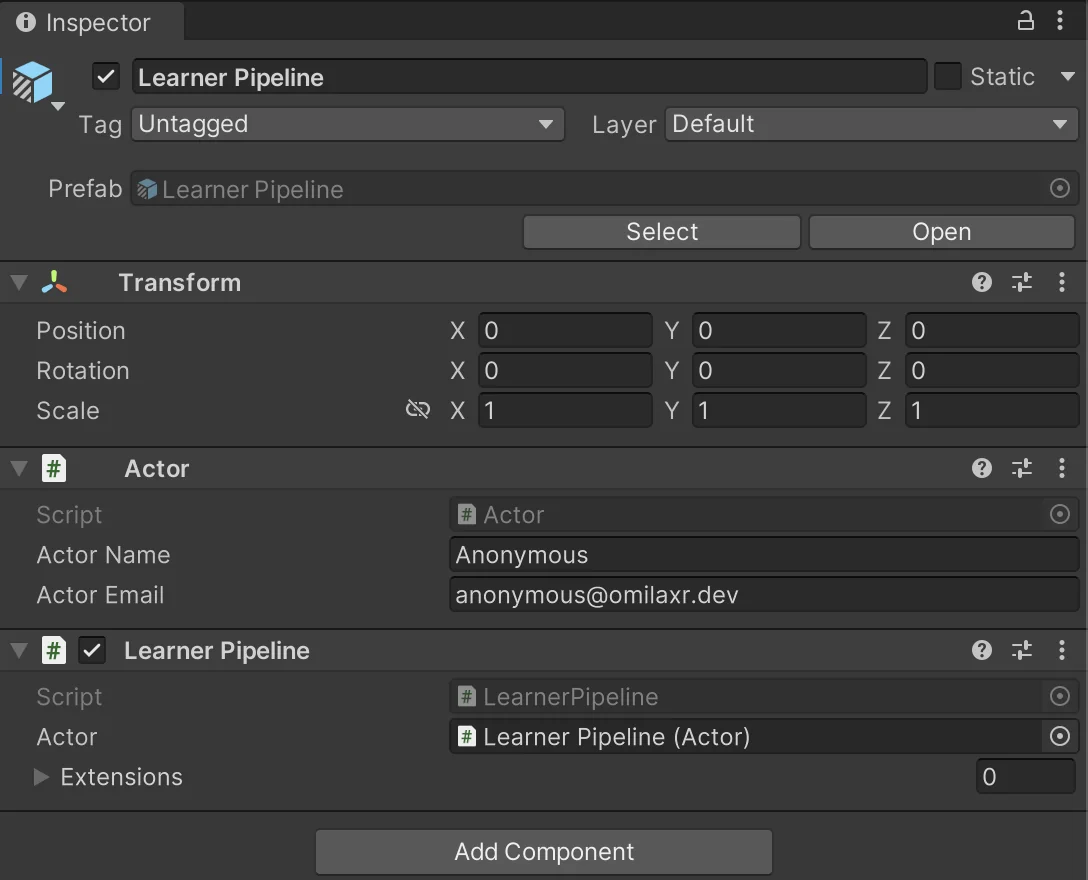
In our example, we use an explicit Learner Pipeline. Alternatively, to create a custom pipeline, it is sufficient to use the Pipeline component directly. Although a separate component is not strictly required for a custom pipeline, we strongly recommend creating one. Below is an example of what such a custom pipeline component might look like.
[AddComponentMenu("OmiLAXR / 0) Pipelines / Learner Pipeline")]
public class LearnerPipeline : Pipeline
{
   // do nothing
}[AddComponentMenu("OmiLAXR / 0) Pipelines / System Pipeline")]
public class SystemPipeline : Pipeline
{
// do nothing
}[AddComponentMenu("OmiLAXR / 0) Pipelines / Custom Pipeline")]
public class CustomPipeline : Pipeline
{
// do nothing
}Step 1: Listener
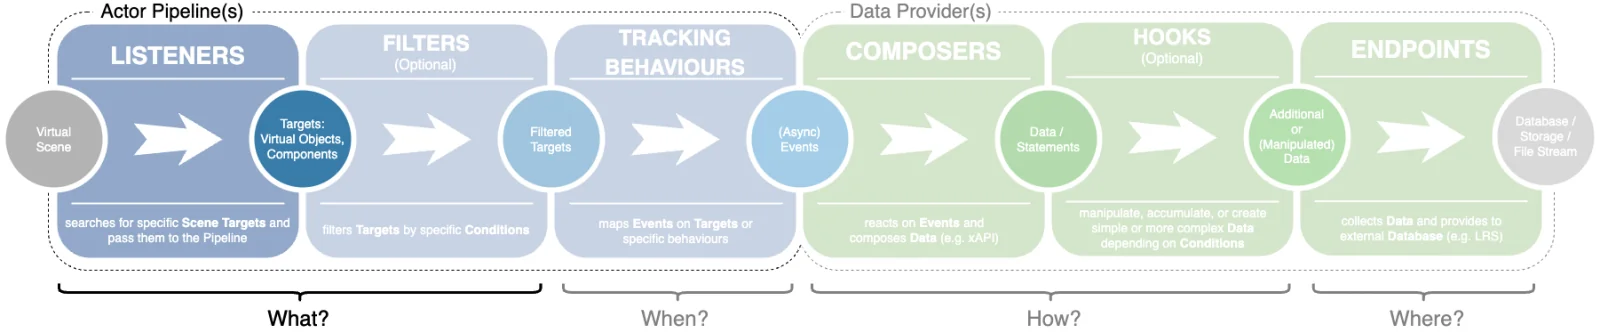
In the first step, you can work with specific scene objects by using Listeners to pass them to the pipeline.
You may define a single Listener for multiple objects or use separate Listeners for different cases.
In the following example, the Listener searches for GameObjects that have the SelectableObjectsListener component. These objects are passed to the required function Found(objects: Selectables[]). Note: Since the parameter of Found(objects: Object[]) is an array of type Object, it is also valid to pass components instead of GameObjects.
[AddComponentMenu("OmiLAXR / 1) Listeners / <Selectable> Listener")]
[Description("Provides all <Selectable> components to pipeline.")]
public sealed class SelectableObjectsListener : Listener
{
    public override void StartListening()
    {
        var selectables = FindObjectsOfType<Selectable>();
        Found(selectables);
    }
}[AddComponentMenu("OmiLAXR / 1) Listeners / <XRBaseInteractable> Objects Listener (UnityXR)")]
[Description("Provides all <XRBaseInteractable> components to pipeline.")]
public sealed class XRBaseInteractableListener : Listener
{
public override void StartListening()
{
var interactables = FindObjectsOfType<XRBaseInteractable>();
Found(interactables);
}
}The pipeline is triggered whenever Found(objects: Object[]) is called. This also makes it possible to wait asynchronously for objects that appear later during runtime.
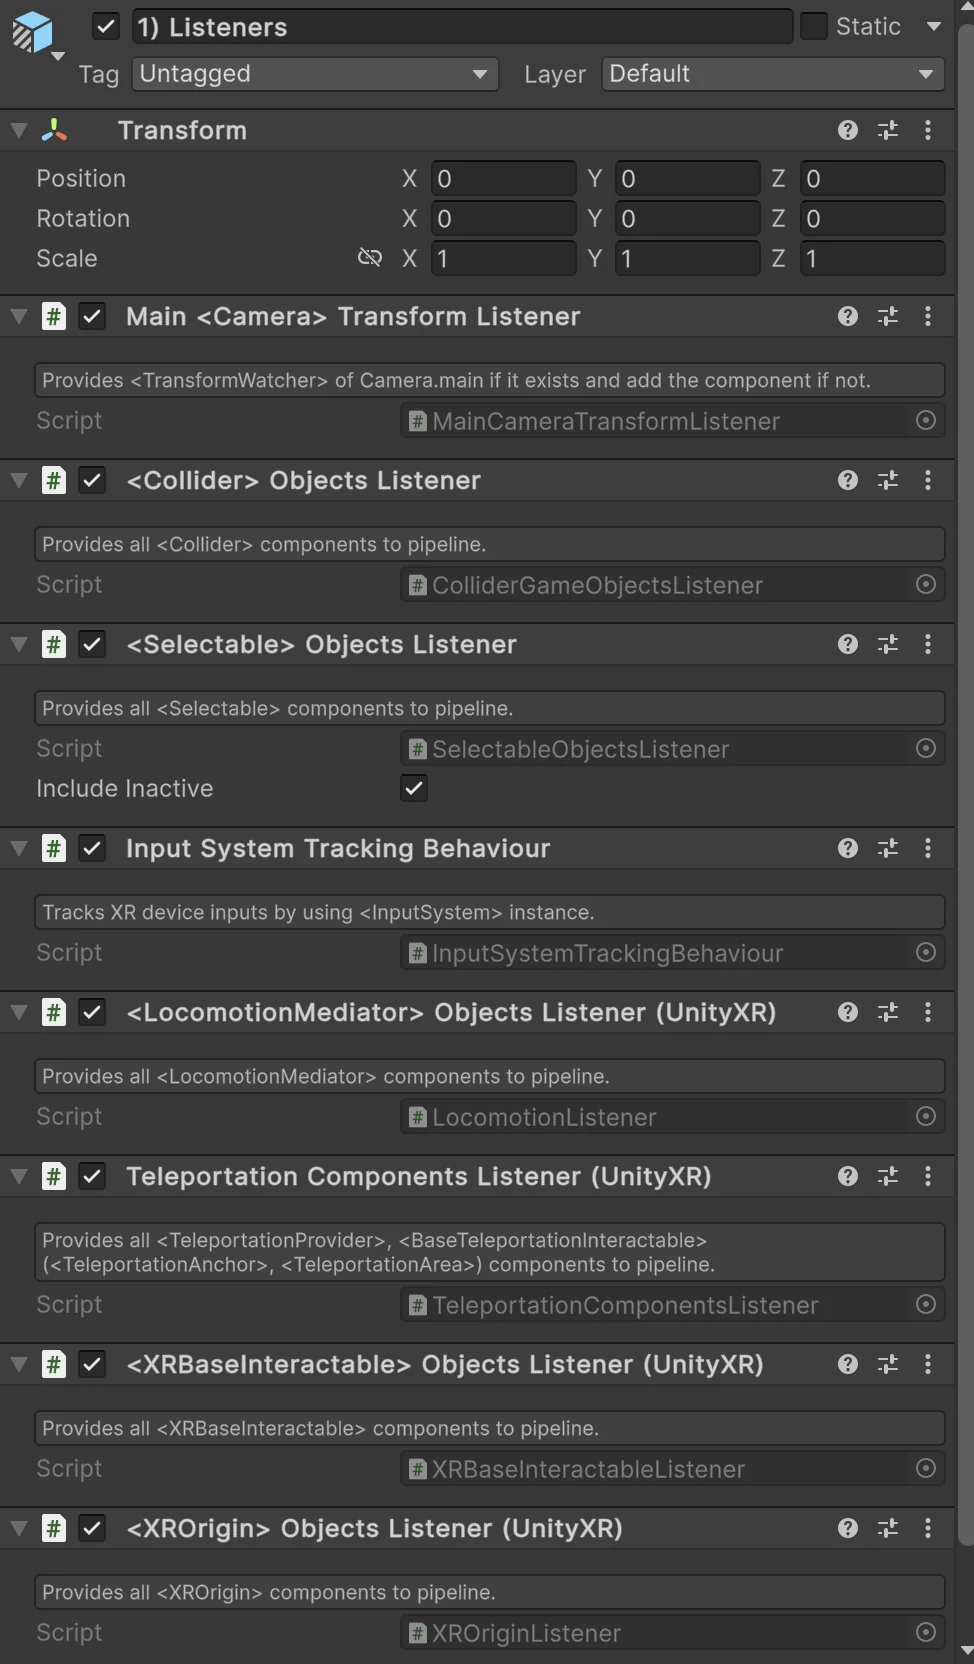
The order of components is not relevant. All listeners are attached to a single GameObject (see Fig. 5).
Save time by using AutoListener
If you only need to find specific game components as shown in the example above, we provide an easier way to implement this. Below is an equivalent implementation of SelectableObjectsListener using AutoListener. Technically, AutoListener works the same way. The only thing you need to do is provide the desired type.
[AddComponentMenu("OmiLAXR / 1) Listeners / <Selectable> Listener")]
[Description("Provides all <Selectable> components to pipeline.")]
public sealed class SelectableObjectsListener : AutoListener<Selectable>
{
   // do nothing
}[AddComponentMenu("OmiLAXR / 1) Listeners / <XRBaseInteractable> Objects Listener (UnityXR)")]
[Description("Provides all <XRBaseInteractable> components to pipeline.")]
public sealed class XRBaseInteractableListener : AutoListener<XRBaseInteractable>
{
// do nothing
}
Step 2: Filters
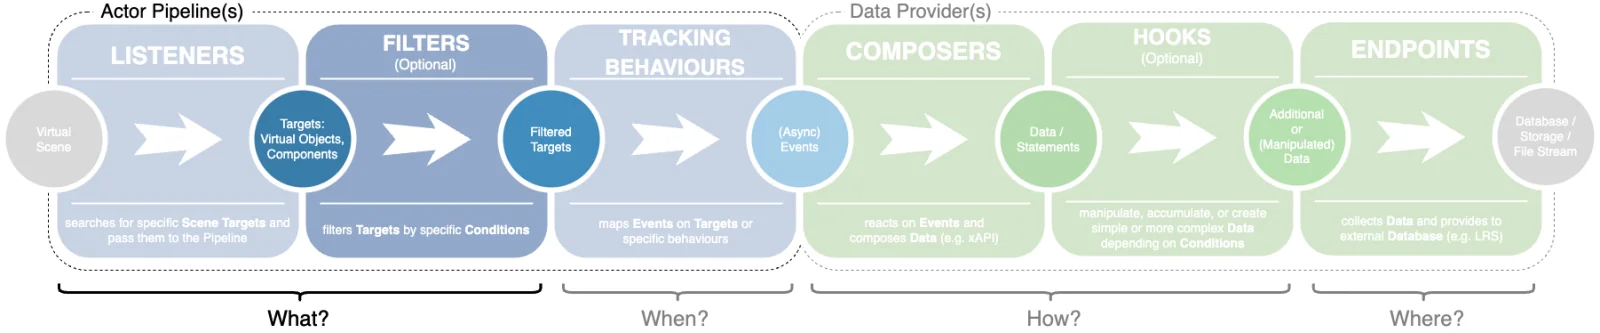
The objects from the previous step are passed as input to the filtering stage.
Filters can selectively isolate certain objects from the full set of input objects. This is useful in scenarios where you need to blacklist specific objects or manage particular ones (such as InputManager). Since filters are applied in sequence, their order is important — objects that have already been filtered out will not be passed to subsequent filters.
The following example demonstrates how to filter specific objects by name using a blacklist.
[AddComponentMenu("OmiLAXR / 2) Filters / Blacklist Filter")]
[Description("Filters found objects by a blacklist of tracking names. The names are get with go.GetTrackingName().")]
public class BlacklistFilter : Filter
{
    public List<string> blacklist;
    public override Object[] Pass(Object[] objects)
    {
        return objects.Where(go => !blacklist.Contains(go.GetTrackingName())).ToArray();
    }
}[AddComponentMenu("OmiLAXR / 2) Filters / <Exclude From Tracking> Filter")]
[Description("Filters found objects that have the component <Exclude From Tracking>.")]
public class ExcludeFromTrackingFilter : Filter
{
public override Object[] Pass(Object[] objects)
{
return objects.Exclude<ExcludeFromTracking>();
}
}Step 3: Tracking Behaviours
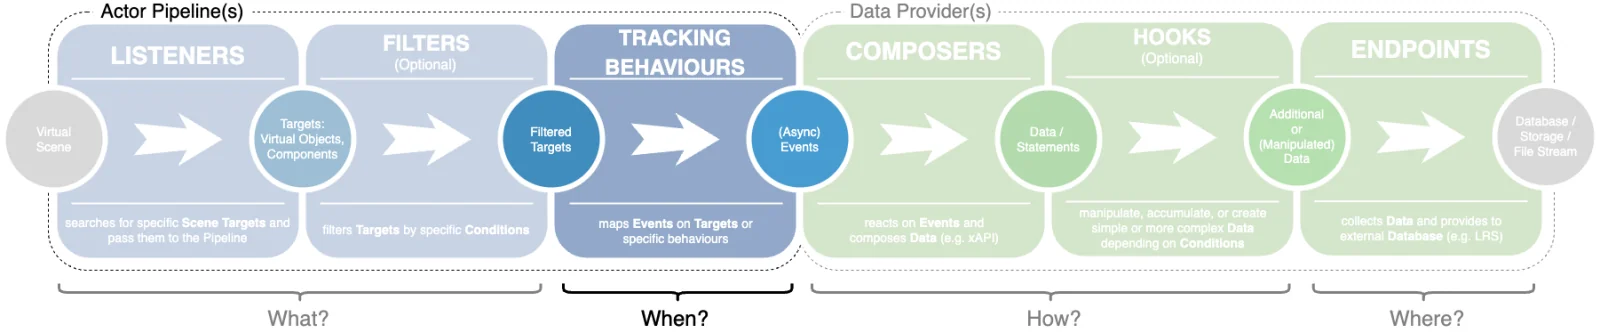
Tracking Behaviours serve two main purposes. First, they can process previously passed objects and perform actions on them. For example, if a list of buttons is provided, Tracking Behaviourscan attach listeners to their click events.
In addition, the explicit event class TrackingBehaviourEvent ensures a clean binding and unbinding of listener events whenever the pipeline is started, paused, or restarted. If you want to use other event types, you will need to unbind the events manually by using Dispose(Object[] objects).
Base Classes
There are three ways to implement Tracking Behaviours:
- TrackingBehaviour<T>: Recommended in most cases. You need to implement AfterFilteredObjects(T[] objects).
- TrackingBehaviour: Equivalent to TrackingBehaviour<Object>, but you implement AfterFilteredObjects(Object[] objects). Recommended if you need to handle different types of objects in one class.
- ObjectlessTrackingBehaviour: Choose this base class if you only want to use other methods like Start() and Update(), or the events below, and don't need to work with piped objects. It is based on TrackingBehaviour<Object>and leaves the AfterFilteredObjects method empty.
The following examples demonstrate various Tracking Behaviours.
[AddComponentMenu("OmiLAXR / 3) Tracking Behaviours / UI Tracking Behaviour")]
[Description("Tracks interaction with <Button>, <Slider>, <Dropdown>, <TMP_Dropdown>, <Toggle>, <InputField>, <TMP_InputField> and <Scrollbar> components.")]
public class UiTrackingBehaviour : TrackingBehaviour<Selectable>
{
    [Gesture("UI"), Action("Click")]
    public TrackingBehaviourEvent<Button> OnClickedButton = new TrackingBehaviourEvent<Button>();
    ...
    protected override void AfterFilteredObjects(Selectable[] selectables)
    {
        foreach (var selectable in selectables)
        {
            var type = selectable.GetType();

            if (type == typeof(Button))
            {
                var button = (Button)selectable;
                OnClickedButton.Bind(button.onClick, () =>
                {
                    OnClickedButton?.Invoke(this, button);
                });
            }
            else if (type == typeof(Slider))
            {
                var slider = (Slider)selectable;
                OnChangedSlider.Bind(slider.onValueChanged,
                    value => { OnChangedSlider.Invoke(this, slider, value); });
            }            ...        }
    }
}[AddComponentMenu("OmiLAXR / 3) Tracking Behaviours / XRBaseInteractable Tracking Behaviour (UnityXR)"),
Description("A <InteractableTrackingBehaviour> for tracking XR controllers by using <XRBaseInteractable> components.")]
public class XRBaseInteractableTrackingBehaviour : InteractableTrackingBehaviour
{
private UnityAction<HoverEnterEventArgs> _hoverEnterAction;
private UnityAction<HoverExitEventArgs> _hoverExitAction;
private void SelectEnter(SelectEnterEventArgs e)
{
OnGrabbed.Invoke(this, new InteractableEventArgs(e.interactableObject.transform.gameObject));
}
private void SelectExit(SelectExitEventArgs e)
{
OnInteracted.Invoke(this, new InteractableEventArgs(e.interactableObject.transform.gameObject));
}
protected override void AfterFilteredObjects(Object[] objects)
{
var interactables = Select<XRBaseInteractable>(objects);
foreach (var interactable in interactables)
{
interactable.hoverEntered.AddListener(_hoverEnterAction = e =>
{
OnTouched.Invoke(this, new InteractableEventArgs(e.interactableObject.transform.gameObject));
});
interactable.hoverExited.AddListener(_hoverExitAction = e =>
{
OnReleased.Invoke(this, new InteractableEventArgs(e.interactableObject.transform.gameObject));
});
interactable.selectEntered.AddListener(SelectEnter);
interactable.selectExited.AddListener(SelectExit);
}
}
protected override void Dispose(Object[] objects)
{
base.Dispose(objects);
var interactables = Select<XRBaseInteractable>(objects);
foreach (var interactable in interactables)
{
interactable.hoverEntered.RemoveListener(_hoverEnterAction);
interactable.hoverExited.RemoveListener(_hoverExitAction);
interactable.selectEntered.RemoveListener(SelectEnter);
interactable.selectExited.RemoveListener(SelectExit);
}
}
}Pipeline Events
Tracking Behaviours also support several events you can react to:
- OnStartedPipeline: Triggered when the pipeline starts.
- OnStoppedPipeline: Triggered when the pipeline stops.
- AfterFoundObjects: Triggered before any filters are applied.
- AfterFilteredObjects: A mandatory method you must implement (unless you're using ObjectlessTrackingBehaviour).
[AddComponentMenu("OmiLAXR / 3) Tracking Behaviours / Session Tracking Behaviour")]
[Description("Tracks the start and end of a session.")]
public class SessionTrackingBehaviour : ObjectlessTrackingBehaviour
{
public readonly TrackingBehaviourEvent<DateTime> OnSessionStarted = new TrackingBehaviourEvent<DateTime>();
public readonly TrackingBehaviourEvent<DateTime> OnSessionStopped = new TrackingBehaviourEvent<DateTime>();
protected override void OnStartedPipeline(Pipeline pipeline)
{
OnSessionStarted.Invoke(this, DateTime.Now);
}
protected override void OnStoppedPipeline(Pipeline pipeline)
{
OnSessionStopped.Invoke(this, DateTime.Now);
}
}The core concept is to react to any kind of action (such as button clicks or interactions) and emit public events for further processing. These events serve as an interface for composers.
(Special Use Cases Only) Standardized Tracking Behaviour
We are working on standardizing certain Tracking Behaviours. For example, in the case of Interactables or EyeTracking, the same events must be triggered across all XR frameworks. The only difference lies in the Unity components that must be handled and the conditions under which the events occur. This allows us to predefine xAPI statements for those events.
Here are our currently standardized Tracking Behaviours. All you need to do is extend these classes and trigger the corresponding events. Since there are already standardized Composers available in OmiLAXR.xAPI, you don’t need to implement your own.
public abstract class InteractableTrackingBehaviour : TrackingBehaviour
{
[Gesture("XRController"), Action("Interacted")]
public TrackingBehaviourEvent<InteractableEventArgs> OnInteracted = new TrackingBehaviourEvent<InteractableEventArgs>();
[Gesture("XRController"), Action("Touched")]
public TrackingBehaviourEvent<InteractableEventArgs> OnTouched = new TrackingBehaviourEvent<InteractableEventArgs>();
[Gesture("XRController"), Action("Released")]
public TrackingBehaviourEvent<InteractableEventArgs> OnReleased = new TrackingBehaviourEvent<InteractableEventArgs>();
[Gesture("XRController"), Action("Grabbed")]
public TrackingBehaviourEvent<InteractableEventArgs> OnGrabbed = new TrackingBehaviourEvent<InteractableEventArgs>();
}public abstract class EyeTrackingBehaviour : ObjectlessTrackingBehaviour
{
/// <summary>
/// Notable change in pupil size occurs. Track cognitive load or emotional response.
/// </summary>
public abstract PupilDilationData? GetPupilDilationData();
public abstract double? GetViewingAngle();
/// <summary>
/// The eye moves on to focus on a particular point (fixation). Log attention on specific Areas of Interest (AOIs), durations, and transitions.
/// </summary>
[Gesture("Eyes"), Action("Fixate")]
public readonly TrackingBehaviourEvent<FixationData> OnFixated = new TrackingBehaviourEvent<FixationData>();
/// <summary>
/// Rapid movement occurs between two fixations. Track gaze shifts and identify scanning patterns.
/// </summary>
[Gesture("Eyes"), Action("Saccade")]
public readonly TrackingBehaviourEvent<SaccadeData> OnSaccaded = new TrackingBehaviourEvent<SaccadeData>();
/// <summary>
/// Small involuntary movement happens during fixation. Study attention or response to stimuli within a fixation.
/// </summary>
[Gesture("Eyes"), Action("Micro Saccade")]
public readonly TrackingBehaviourEvent<MicroSaccadeData> OnMicroSaccaded = new TrackingBehaviourEvent<MicroSaccadeData>();
/// <summary>
/// Gaze data is temporarily lost due to a blink. Monitor engagement, fatigue, or workload.
/// </summary>
[Gesture("Eyes"), Action("Blink")]
public readonly TrackingBehaviourEvent<BlinkData> OnBlinked = new TrackingBehaviourEvent<BlinkData>();
/// <summary>
/// Notable change in pupil size occurs. Track cognitive load or emotional response.
/// </summary>
[Gesture("Eyes"), Action("Pupil Dilation")]
public readonly TrackingBehaviourEvent<PupilDilationData> OnPupilDilation = new TrackingBehaviourEvent<PupilDilationData>();
}
(Example) Using the standardized Tracking Behaviour
[AddComponentMenu("OmiLAXR / 3) Tracking Behaviours / XRBaseInteractable Tracking Behaviour (UnityXR)"),
Description("A <InteractableTrackingBehaviour> for tracking XR controllers by using <XRBaseInteractable> components.")]
public class XRBaseInteractableTrackingBehaviour : InteractableTrackingBehaviour
{
    private UnityAction<HoverEnterEventArgs> _hoverEnterAction;
    private UnityAction<HoverExitEventArgs> _hoverExitAction;

    private void SelectEnter(SelectEnterEventArgs e)
    {
        OnGrabbed.Invoke(this, new InteractableEventArgs(e.interactableObject.transform.gameObject));
    }

    private void SelectExit(SelectExitEventArgs e)
    {
        OnInteracted.Invoke(this, new InteractableEventArgs(e.interactableObject.transform.gameObject));
    }

    protected override void AfterFilteredObjects(Object[] objects)
    {
        var interactables = Select<XRBaseInteractable>(objects);
        foreach (var interactable in interactables)
        {
            interactable.hoverEntered.AddListener(_hoverEnterAction = e =>
            {
                OnTouched.Invoke(this, new InteractableEventArgs(e.interactableObject.transform.gameObject));
            });
            interactable.hoverExited.AddListener(_hoverExitAction = e =>
            {
               OnReleased.Invoke(this, new InteractableEventArgs(e.interactableObject.transform.gameObject));
            });
            interactable.selectEntered.AddListener(SelectEnter);
            interactable.selectExited.AddListener(SelectExit);
        }
    }

    protected override void Dispose(Object[] objects)
    {
        base.Dispose(objects);
        var interactables = Select<XRBaseInteractable>(objects);
        foreach (var interactable in interactables)
        {
            interactable.hoverEntered.RemoveListener(_hoverEnterAction);
            interactable.hoverExited.RemoveListener(_hoverExitAction);
            interactable.selectEntered.RemoveListener(SelectEnter);
            interactable.selectExited.RemoveListener(SelectExit);
        }
    }
}Step 4: Composers
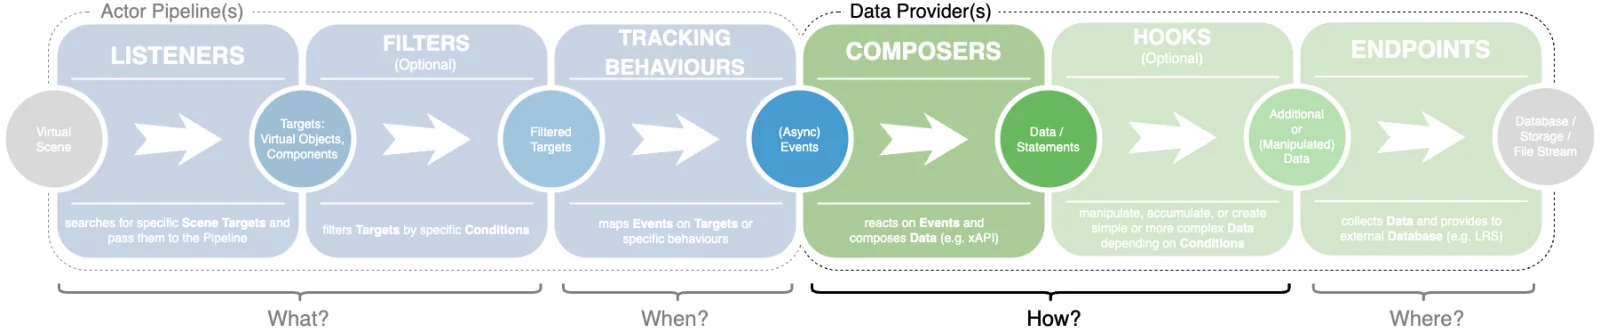
Composers are the components responsible for translating the events from Tracking Behaviours into data rows — in our case, xAPI statements. To work with xAPI data, you need to extend xApiComposer<T>, where <T> is a specific Tracking Behaviour.
In our example, the composer listens for the OnClickedButton event triggered by UiTrackingBehaviour.
An xAPI statement is composed using the xAPI syntax: actor.Does(verb).Activity(activity). Additional information (such as context, result, and activity extensions) can be added using the .WithContext(resultExtension),.WithContext(contextExtension), and .WithExtension(activityExtension) methods.
The actor is automatically determined based on the actor pipeline that triggered the corresponding Tracking Behaviour.
The xAPI registry can be accessed via the xapi field.
For compatibility, the older syntax is still supported — using xAPIv1.CreateStatement(statement) (instead of actor) and xAPI_Definitions (instead of xapi).
Additionally, we allow the specification of a responsible person to help ensure data quality. This is handled through the required method GetAuthor(), which automatically adds author information to the xAPI statement.
[AddComponentMenu("OmiLAXR / 4) Composers / UI Statement Composer (xAPI)")]
[Description("Creates statements:\n- actor clicked uiElement with uiElementType('button'), vrObjectName(String), uiElementValue(text)" +
                 "\n- actor changed uiElement with uiElementType('slider'), vrObjectName(String), uiElementValue(String), uiElementMinValue(Float), uiElementMaxValue(Float)" +
... )]public sealed class UiComposer : XApiComposer<UiTrackingBehaviour>
{
    protected override Author GetAuthor()
        => new Author("Sergej Görzen", "goerzen@cs.rwth-aachen.de");
    protected override void Compose(UiTrackingBehaviour tb)
    {
        tb.OnClickedButton.AddHandler((_, button) =>
        {
            var buttonName = button.gameObject.GetTrackingName();
            var text = button.GetTextOrDefault();

            var statement = actor.Does(xapi.generic.verbs.clicked)
                .WithExtension(xapi.virtualReality.extensions.activity
                    .uiElementValue(text)
                    .uiElementType("button")
                    .vrObjectName(buttonName))
                .Activity(xapi.virtualReality.activities.uiElement);

            SendStatement(statement);
        });
        tb.OnChangedSlider.AddHandler((_, slider, newValue) =>
        {
            var maxValue = slider.maxValue;
            var minValue = slider.minValue;
            var sliderName = slider.GetTrackingName();
            var stmt = actor.Does(xapi.generic.verbs.changed)
                .WithExtension(xapi.virtualReality.extensions.activity
                    .uiElementType("slider")
                    .vrObjectName(sliderName)
                    .uiElementValue(newValue)
                    .uiElementMinValue(minValue)
                    .uiElementMaxValue(maxValue))
                .Activity(xapi.virtualReality.activities.uiElement);
            SendStatement(stmt);
        });        ...
    }
}[AddComponentMenu("OmiLAXR / 4) Composers / Interactable Composer"),
Description("Creates statements:\n- actor interacted/grabbed/touched/released vrObject with vrObjectName(String)")]
public class InteractableComposer : xApiComposer<InteractableTrackingBehaviour>
{
public override Author GetAuthor()
=> new Author("Sergej Görzen", "goerzen@cs.rwth-aachen.de");
protected override void Compose(InteractableTrackingBehaviour tb)
{
tb.OnInteracted.AddHandler((_, e) =>
{
var go = e.Target;
var stmt = actor.Does(xapi.virtualReality.verbs.interacted)
.Activity(xapi.virtualReality.activities.vrObject)
.WithExtension(xapi.virtualReality.extensions.activity.vrObjectName(go.GetTrackingName()));
SendStatement(stmt);
});
tb.OnGrabbed.AddHandler((sender, e) =>
{
var go = e.Target;
var stmt = actor.Does(xapi.virtualReality.verbs.grabbed)
.Activity(xapi.virtualReality.activities.vrObject)
.WithExtension(xapi.virtualReality.extensions.activity.vrObjectName(go.GetTrackingName()));
SendStatement(stmt);
});
tb.OnTouched.AddHandler((sender, e) =>
{
var go = e.Target;
var stmt = actor.Does(xapi.virtualReality.verbs.touched)
.Activity(xapi.virtualReality.activities.vrObject)
.WithExtension(xapi.virtualReality.extensions.activity.vrObjectName(go.GetTrackingName()));
SendStatement(stmt);
});
tb.OnReleased.AddHandler((sender, e) =>
{
var go = e.Target;
var stmt = actor.Does(xapi.virtualReality.verbs.released)
.Activity(xapi.virtualReality.activities.vrObject)
.WithExtension(xapi.virtualReality.extensions.activity.vrObjectName(go.GetTrackingName()));
SendStatement(stmt);
});
}
}If another data standard is preferred instead of xAPI, then a new data composer class needs to be implemented, analogous to XApiComposer.
(Optional) Higher or Semantic Composers
Our pipeline allows the creation of higher-level Composers just before the data is passed to hooks. These composers are useful, for example, when you want to generate additional statements based on previously composed ones. They are triggered whenever a defined set of conditions is met.
In our example, a new statement is created when a mouse click occurs once and a move event occurs five times. To evaluate the statements, several Match functions are available.
[AddComponentMenu("OmiLAXR / 4.1) Higher Composers / Example Semantic Composer (YOUR_MODULE_NAME)")]
public sealed class ExampleSemanticComposer : xApiStatementSemanticComposer<LearnerPipeline>
{
    protected override Author GetAuthor()
        => new Author("Sergej Görzen", "goerzen@cs.rwth-aachen.de");
    protected override Dictionary<string, MatchCondition<xApiStatement>> Conditions()
        => new Dictionary<string, MatchCondition<xApiStatement>>
        {
            { "clicked", new MatchCondition<xApiStatement>(1, stmt => stmt.MatchKeys("clicked", "mouse")) },
            { "moved", new MatchCondition<xApiStatement>(10, stmt => stmt.MatchKeys("moved", "mouse")) }
        };
    protected override void OnMatchAllConditions(Dictionary<string, IEnumerable<xApiStatement>> matchingStatements)
    {
        // Get clicked statement
        var clickedStatement = matchingStatements["clicked"].First();
        // Get first and last move statement
        var movedMatch = matchingStatements["moved"];
        var firstMoveStatement = movedMatch.First();
        var lastMoveStatement = movedMatch.Last();
        // Compose new statement
        var stmt = actor.Does(xapi.generic.verbs.achieved)
            .Activity(xapi.generic.activities.goal)
            .WithExtension(xapi.generic.extensions.activity.name("dragged"));
        SendStatement(stmt);    }
}
Step 5: Hooks
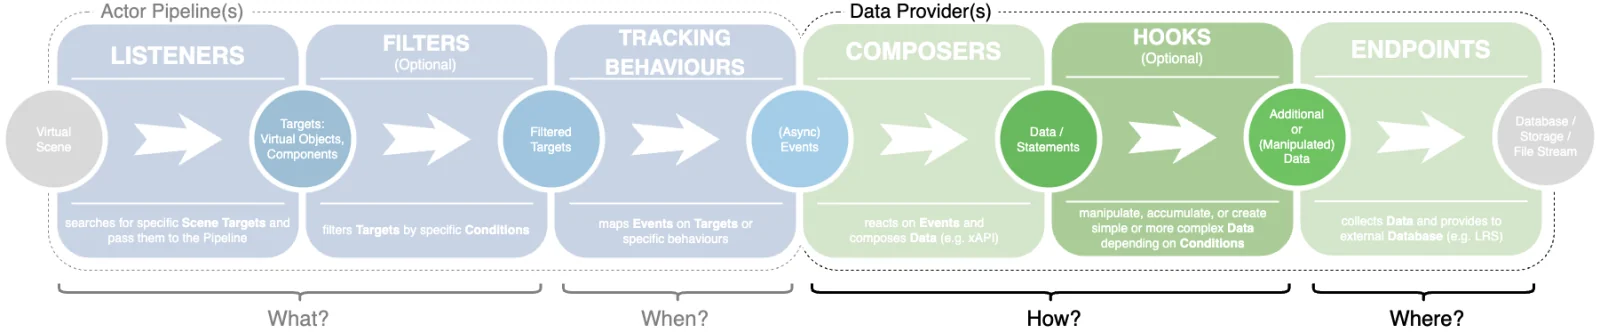
Hooks are a mechanism that allows you to manipulate existing statements composed by all Composers.
One common use case for Hooks is to extend all statements with additional context information.
Hooks can also be used to modify specific statements. For example, whenever a statement with the verb "clicked" is detected, the verb can be changed to "interacted".
[AddComponentMenu("OmiLAXR / 5) Hooks / Scenario Context Hook (xAPI)")]
[Description("Adds language by <ScenarioLanguage>, platform by <PlatformInformation>, fps by <FpsMonitor>, registration by <Registration> and active scene, game and game version to the context of all statements.")]
public class ScenarioContextHook : xApiHook
{
    protected override xApiStatement AfterCompose(xApiStatement statement)
    {
        ...
        if (FpsMonitor.Instance && FpsMonitor.Instance.enabled)
        {
            // Todo: add when fps is in Registry
            statement.WithContext(xapi.systemControl.extensions.context.fps(FpsMonitor.Instance.fps));
        }

        ...
        return statement;
    }
}[AddComponentMenu("OmiLAXR / 5) Hooks / Peripheral Physiological Measures (PPM) Hook (xAPI)")]
[Description("Adds peripheral physiological measures values to each statement.")]
public class PpmHook : xApiHook
{
protected override xApiStatement AfterCompose(xApiStatement statement)
{
var heartRateProvider = GetProvider<HeartRateProvider>(statement);
if (heartRateProvider && heartRateProvider.enabled)
{
statement.WithResult(xapi.ppm.extensions.result.heartRate(heartRateProvider.GetHeartRate()));
}
return statement;
}
}[AddComponentMenu("OmiLAXR / 5) Hooks / Example Hook (YOUR_MODULE_NAME)")]
public sealed class ExampleHook : xApiStatementHook
{
protected override xApiStatement AfterCompose(xApiStatement statement)
{
// change all clicked verbs by interacted
if (statement.MatchKeys("clicked", "uiElement"))
{
DebugLog.xAPI.Print($"Matches keys 'clicked' and 'uiElement': {statement}");
statement.Verb(xapi.virtualReality.verbs.interacted)
.ChangedBy("Sergej G.", "goerzen@informatik.rwth-aachen.de");
DebugLog.xAPI.Print($"Exchanged 'clicked' by 'interacted': {statement}");
}
...}Step 6: Endpoints
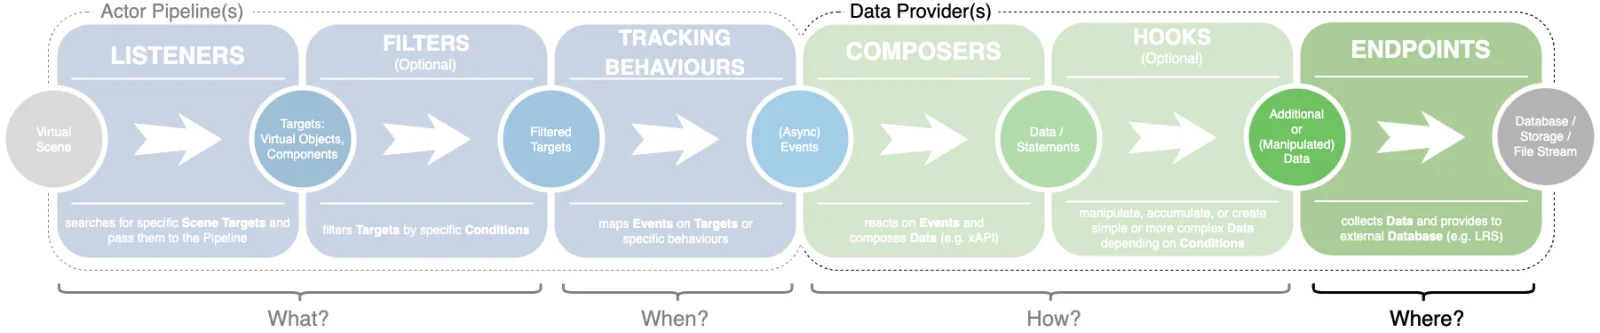
Endpoints are responsible for translating data into the required format (e.g., JSON) and delivering it to the desired endpoint. This endpoint could be, for example, a simple MongoDB instance, a REST API, or a Learning Record Store. Since we are using xAPI in our example, the xAPI statement is transformed into a TinCan-compliant object (using TinCan.NET) and then sent to a Learning Record Store. The TinCan.NET library is included with the OmiLAXR.xAPI module.
As long as you don’t need a custom endpoint type, you can reuse the existing components.
[AddComponentMenu("OmiLAXR / 6) Endpoints / Learning Record Store (LRS for xAPI)")]
[Description("Sends all received statements a Learning Record Store asynchronously.")]
public class LearningRecordStore : Endpoint
{
    ...

    protected override TransferCode HandleSending(IStatement statement)
    {

        var stmt = statement as xApiStatement;
        // Transfer single statement to LRS
        var resp = _remoteLRS.SaveStatement(stmt.ToTinCanStatement(statementIdUri));

        if (resp.success)
            return TransferCode.Success;

        // Print error message to know more about on debug
        DebugLog.xAPI.Error($"Error Message: {resp.errMsg}, Http Error: {resp.httpException}");
        return TransferCode.Error;
    }
}[AddComponentMenu("OmiLAXR / 6) Endpoints / Local Endpoint")]
[Description("Stores statements on local path.")]
public class LocalEndpoint : Endpoint
{
...
protected override TransferCode HandleSending(IStatement statement)
{
try
{
_streamWriter.WriteLine(statement.ToDataStandardString());
}
catch (IOException ex)
{
Debug.LogException(ex);
return TransferCode.Error;
}
return TransferCode.Success;
}
}[AddComponentMenu("OmiLAXR / 6) Endpoints / Statement Printer")]
[Description("Prints all received statements to Unity Editor console. May be used for testing purposes.")]
public class StatementPrinter : Endpoint
{
protected override TransferCode HandleSending(IStatement statement)
{
DebugLog.OmiLAXR.Print("Sent statement: " + statement);
return TransferCode.Success;
}
}